
A running toilet is one of those problems that exists in the background. It does not make a big noise. It does not cause any visible damage. It is one of those things that you get used to—the sound of a low hissing noise coming from the bathroom. I have lived with a running toilet for almost two months now. I just looked at my water bill, and I could not believe the numbers.
I was being charged extra for 200 gallons of water every day due to one toilet that would not stop running. The part I needed only cost me $6. It only took me 15 minutes to fix the toilet. The water bill ended the very next month.
If you have a running toilet, it is nearly always one of three things: a bad flapper, a bad fill valve, or a float that is set at the wrong height. All three are very simple fixes. All three can be fixed for under $15. And none of these fixes require a plumber.
In this article, we will show you how to determine which of these three things is wrong with your running toilet. Then, we will show you how to fix that thing. It will take us 20 minutes, and it will take you 20 minutes as well.
Why a Running Toilet Is a Bigger Problem Than It Sounds
For most people, a running toilet is not a big deal. The issue is that it is costing you money on your bill without your knowledge.
A running toilet wastes 200 gallons of water every day. A toilet that is running quickly, or a toilet that is running quickly enough that you can hear a stream of water coming from it, is wasting up to 4,000 gallons of water every day. This is costing you between $70 and over $500 on your bill.
The solution to a running toilet is always inexpensive and quick. The longer you wait, the more you are wasting.
Key Insight: “Toilet leaks are one of the most common and costly types of water waste,” states the EPA’s WaterSense program. “A running toilet can waste over 73,000 gallons of water in one year, or the equivalent of a filled swimming pool.”
Understanding the Inside of Your Toilet Tank
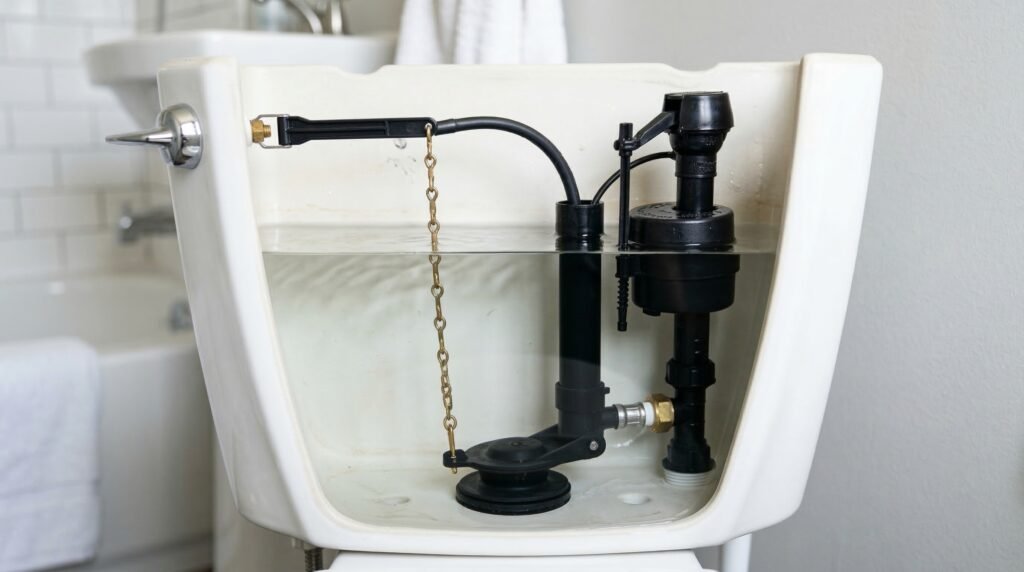
Before you touch anything, remove the lid from your toilet tank. Toilet tank lids are made of ceramic and are easily broken. Open the tank. Inside the tank, you will see three main things. They control everything.
The Flapper
The rubber disc is at the bottom of the tank. This disc covers a hole in the tank called the flush valve seat. When you flush the toilet, the flapper opens, and water rushes into the bowl. When you are refilling, the flapper closes, keeping the water in the bowl. If you have an old, warped flapper that does not close completely, you will have running water into the bowl.
The Fill Valve
The tall cylindrical device on the left side of the tank. Its purpose is to refill the tank with fresh water after each flush and turn off automatically when the water level is correct. A worn-out fill valve does not turn off. Instead, it continues to supply water to the tank, overflowing to the overflow tube and draining continuously.
The Float
The device that tells the fill valve when to stop filling the tank. In older toilets, it is a ball on the end of a long rod (ball float). In newer toilets, it is a cup or cylinder that moves up and down on the fill valve rod (cup float). If the float is set too high, the water level is above the overflow tube and drains continuously. If the float is damaged, it does not send any signal to the fill valve to turn off.
Pro Tip: First, take a quick look without the tank lid. See what’s going on. Do you see water trickling into the bowl before you even flush the toilet? That’s your flapper. Do you see water trickling into the overflow tube? That’s your float or fill valve. This step alone can get you focused on the problem in 30 seconds or less.
What You’ll Need — Tools and Materials
You likely won’t need all of these — it depends on which component is faulty. Buy only what you need after completing the diagnosis in Step 1.
Tools
- Adjustable wrench: This tool is needed in order to disconnect the water supply pipe, in case the fill valve is to be replaced.
- Sponge and Bucket: This is needed in order to drain the water from the tank.
- Rubber Gloves: Although the water in the tank is clean, it is still recommended to use these.
Materials
- Replacement flapper: Costs between $4 and $8. Can be found at Home Depot. Most common repair job. Available in universal fit and for your brand-name toilet.
- Replacement fill valve: Costs between $10 and $15. Fluidmaster 400A is a good brand. Fits almost all toilets.
- Toilet repair kit: Costs between $15 and $20. Comes with a flapper and a fill valve. If you’re not sure what your toilet needs.
Pro Tip: Fluidmaster 400A is the toilet repair industry standard. It works on 95% of all toilets, installs in less than 10 minutes, and has a 5-year warranty. It has been the plumber’s and DIYer’s first choice for decades. And at $10-$12 on the Home Depot shelves, it’s the one I always recommend.
Step 1: Diagnose the Cause
Don’t guess — diagnose. Each of the three causes has a specific test. Run through these in order, and you’ll know exactly what to fix before buying any parts.
Test 1 — The Food Coloring Test (for flapper leaks)
5-6 food coloring drops are to be added to the tank. The toilet should not be flushed. After 15-20 minutes, check the toilet bowl. If you see water with food coloring, then it means the flapper is leaking.
💡 Pro Tip: No food coloring? You can use a couple of drops of dark liquid, coffee, soy sauce, or even a little dirt. Just anything that visibly colors the water.
Test 2 — The Overflow Tube Check (for float/fill valve issues)
If the tank lid was removed, check the overflow tube, which is a tall open tube in the center of the tank. If you see water running or trickling into the top of the tube, then your float is too high, or your fill valve is not shutting off correctly. The water level should be 1 inch below the top of the overflow tube. If the water level is at or above the top of the tube, you need to adjust your float.
Test 3 — The Fill Valve Shutoff Test
Try lifting the float arm (or the float cup, if your toilet uses a modern fill valve system) by hand as the tank fills with water. When the water stops running as you lift the arm, the float is just too high, which is a simple fix (takes 30 seconds). When the water continues to run as you lift the arm, the fill valve is bad, which means you have to replace the whole thing.
Key Insight: In 8 out of every 10 running toilets, the problem lies with a bad flapper. Before rushing out to buy replacement parts, take a minute to do the food coloring test. This simple fix can eliminate the running toilet problem, requiring only a $6 replacement of the flapper.
Step 2: Fix a Faulty Flapper
If the food coloring test confirmed a flapper leak, this is your fix. It’s the easiest toilet repair you can do — no tools required, takes about 5 minutes.
- Turn off the water supply – this oval shape is located on the back of the toilet, on the wall. This needs to be turned clockwise.
- Flush the toilet – this will drain most of the water in the tank.
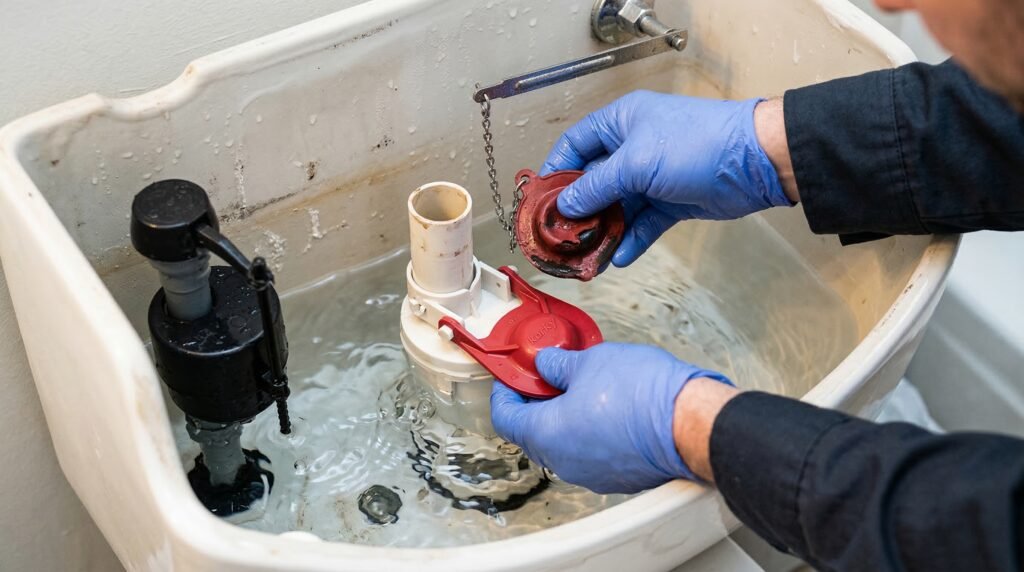
- Unhook the old flapper – this is hooked onto two ears that are clipped onto two pins on either side of the flush valve seat. These two need to be unhooked. The flapper is also hooked onto a chain that is operated by the flush handle. This also needs to be unhooked.
- Bring the old flapper to Home Depot – these are of different sizes, either 2 inches or 3 inches. The size needs to be an exact fit, or you can buy an adjustable universal type of flapper.
- Now insert the new flapper by clipping both ears to the pins on the flush valve. Then, connect the chain to the flush handle. The chain should have ½ inch slack. The chain is not too tight or loose.
- Turn on the water – slowly turn the valve counterclockwise. Allow the tank to fill up completely.
- Flush and test – flush once to test. Listen for the sounds of running water coming from the tank refill. Perform the test with food coloring to ensure the seal is tight.
Pro Tip: The length of the chain attached to the brand new flapper needs to be adjusted so there is ½ inch slack. If there is too much slack, the flapper does not come all the way up when you flush the toilet. Weak flush. If there is not enough slack, the flapper does not come all the way back down. Running toilet. ½ inch slack is the sweet spot.
Safety Warning: Be sure to perform the food coloring test one more time to make sure the new flapper is sealing correctly. Some flappers may appear to be sealing correctly but are leaking around the edges. If you see the dye in the bowl after 15 minutes, make sure the ears of the flapper are securely attached to the pins, and the flapper is securely over the valve seat.
Step 3: Fix a Broken Fill Valve
If Test 3 confirmed the fill valve isn’t shutting off even when you lift the float, the fill valve needs replacing. This sounds more complicated than it is. The whole swap takes about 10–15 minutes.
- Turn off the water supply – the valve is located behind the toilet. The valve turns clockwise.
- Flush – press the handle down to empty the tank.
- Remove existing water – use a sponge to absorb the water in the tank.
- It is a good idea to make it as dry as possible to make the following steps cleaner.
- Disconnect the supply line – the braided hose from the wall to the bottom of the tank.
- There will be a little dripping. Have a towel ready.
- Unscrew the locknut – you will see a plastic locknut holding the fill valve in place. This locknut unscrews the old fill valve. Turn the locknut counterclockwise by hand. The locknut should be hand-tight. Take out the old fill valve straight up and out.
- Install the new Fluidmaster 400A – adjust the height of the new fill valve as instructed. This one twists to adjust the height. Place the new fill valve into the tank. Hand-tighten the locknut under the tank. Be sure not to overtighten the locknut. Only a quarter turn past hand-tight is necessary.
- Reconnect the supply line and refill tube – reconnect the supply hose to the tank. Place the small refill tube attached to the fill valve into the top of the overflow tube.
- Turn the water back on slowly – allow the tank to fill up, and check for leaks at the base of the fill valve and where the water line is connected.
- Adjust the water level – the water level in the tank should be 1 inch below the top of the overflow tube, and this is done by adjusting the float on the new fill valve using the adjustment screw or clip.
Step 4: Adjust the Float
If Test 2 showed that water is flowing into the overflow tube, but Test 3 showed that the fill valve shuts off when you raise the float manually, all you need to do is lower the float. This can be done in 30 seconds.
Ball Float (old toilets have a ball on the end of an arm)
The first thing you need to do is locate the adjusting screw where the float arm meets the fill valve. Turning this screw to the left will lower the float arm, thus lowering the water level. The other thing you can do is simply bend the float arm down slightly by hand. Test your toilet by flushing it. The water level should be 1 inch below the overflow tube.
Cup Float (modern toilets, cup on the fill valve shaft)
Hold the clip on the side of the float cup.
Move the clip down on the fill valve shaft.
The lower the float position, the lower the water level.
Release the clip so it locks into position.
Flush the toilet to test the water level.
Repeat the process to adjust the water level to 1 inch below the top of the overflow tube.
💡 Pro Tip: Once you have been able to successfully adjusted your water level, don’t forget to mark it on the inside of your tank with a permanent marker. This way, you won’t have to keep measuring it each time you need to adjust it.
| Symptom | Likely Cause | Test to Confirm | Fix Needed | Part Cost |
|---|---|---|---|---|
| Color appears in bowl without flushing | Worn flapper | Food coloring test | Replace flapper | $4–$8 |
| Water runs into overflow tube | Float too high | Visual check of water level | Adjust float | $0 |
| Water runs even when float is lifted | Faulty fill valve | Lift float test | Replace fill valve | $10–$15 |
| Weak flush + running water | Chain too short or tangled | Check chain slack | Adjust chain | $0 |
| Water on floor around toilet | Supply line or tank bolt leak | Visual inspection | Tighten or replace | $5–$10 |
Common Mistakes Beginners Make
Replacing Parts Without Diagnosing First
The first error is that you are purchasing a flapper and a fill valve together without first determining which one of the parts is actually the source of the problem. The first thing you need to do is take the three tests. In most cases, only one of the parts is malfunctioning. However, you can save money and time by knowing which one is malfunctioning.
Getting the Wrong Flapper Size
The sizes of the flappers are either 2 or 3 inches. If you purchase a flapper of the wrong size, you can either purchase one that is too big for your tank or one that is too small. A 2-inch flapper is the most common size for toilets. However, you need to check the size of your flapper before you go to the store to purchase one or take one with you when you go to the store.
Wrong Chain Slack After Flapper Replacement
If the chain is slack, you will not achieve a flush as the flapper will not rise completely. This will mean that you will still hold the handle down for a weak flush. If the chain is tight, it will catch under the flapper. This will mean that the flapper will not close properly. This will result in a running toilet. The chain should be exactly ½ inch.
Overtightening the Fill Valve Locknut
The locknut is a piece of plastic that holds the fill valve in the tank. When it is overtightened, it will cause it, as well as the tank itself, to crack. This will mean that you will spend $200 instead of a $10 repair. All you should do is tighten it by hand and a quarter turn with a wrench.
Not Doing the Food Coloring Test After the Repair
A person who has replaced a flapper may flush the toilet once, hear the silence, and assume that the repair is done. A new flapper that is not properly seated will have a slow leak that is too slow to be heard but is fast enough to waste thousands of gallons each year. The food coloring test must be done after the repair.
When to Call a Plumber
A running toilet is almost always a DIY fix. But there are a few situations where professional help makes sense:
- The toilet continues to run after a month with the new flapper. This could indicate that the flush valve seat is damaged and pitted. The flush valve seat should be resurfaced or replaced. This is an advanced repair.
- Cracks in the porcelain tank. Never attempt to repair a cracked toilet tank yourself. The tank holds several gallons of water under high pressure. The crack could fail at any time with disastrous results.
- There is a pooling of water around the base of the toilet. This is a problem that usually occurs when the wax ring seal between the toilet and the floor flange fails. This is a job that has to be done by a professional unless you are handy enough to do it yourself.
- The toilet rocks or sways when you are sitting on it. If your toilet rocks, it may mean the floor flange is damaged, or the toilet bolts are loose.
Safety Warning: If, in your case, you notice that your toilet tank is sweating profusely (where condensation is dripping down the outside of your tank), and at the same time your toilet is running, this could be a sign of a more serious problem that has to do with your internal valves that are consistently letting cold water flow into your tank. You should report both problems to a repair service.
Final Thoughts
A running toilet is one of the most costly issues that should not be left unfixed, and one of the least expensive issues to fix. Once I knew what was going on in the tank, the repair itself took less time than the trip to Home Depot to get the part. The process is simple: perform the three tests to diagnose the problem, buy only the part that you need, follow the instructions for your specific repair method, and make sure that the repair worked by using the food coloring method. Replacing a flapper takes 5 minutes.
Replacing a fill valve takes 15 minutes. Adjusting a float takes 30 seconds. Your water bill will be your ultimate verification that the job was done correctly. One month after repairing mine, the difference in the bill was obvious.

Raza is the founder of DIYbeginners. At 24, he built this site to help complete beginners tackle home improvement without expensive professionals or confusing guides. He writes about building, repairing, and buying the right tools — always from a beginner’s perspective, always without jargon. Any Questions? Contact!