
A hole in the wall is a much bigger problem than it really is. The first time I had to deal with a problem like this, a doorknob had basically punched a hole through the wall. It looked terrible. I had to call someone, it was going to cost me money, and I had to wait a week for a repairman to come out to my house.
It ended up being a simple fix that I could have done myself in an afternoon. I only had to spend about $12 to fix it. The next morning, the wall looked like new again. I remember stepping back from the wall and not being able to see where the hole had been. There is no better feeling than that.
The best way to fix a hole in your drywall is to know which method to use to fix your particular hole. A nail pop is a different fix than a hole that is the size of a fist. Once you know which method is best for your particular problem, it is a simple fix that is inexpensive and invisible.
This article will discuss all 5 different sizes of holes that you could have.
What Causes Drywall Damage and Why It’s Simple to Fix
The white material on our walls, called drywall, sheetrock, or gypsum board, is something that is an almost universal feature in every house in America. Drywall is composed of a gypsum plaster core covered by two pieces of paper on each side. This makes it easy to install, easy to finish, and yes, easy to damage.
Doorknobs, furniture, accidents, water damage, and yes, something as innocent as pulling out a nail or two can leave their marks on our walls. Fortunately, the good news is that while drywall is easy to damage, it is also easy to repair.
The fundamental idea behind repairing drywall is that you’re not repairing anything except the surface. That’s it. That’s all there is to it.
Key Insight: Drywall is an almost universal feature in every house in America, according to the Census Bureau, making up more than 97% of all new residential construction in America.
What You’ll Need — Tools and Materials
What you need depends on the size of the hole. Here’s the complete list — you won’t need everything for every repair.
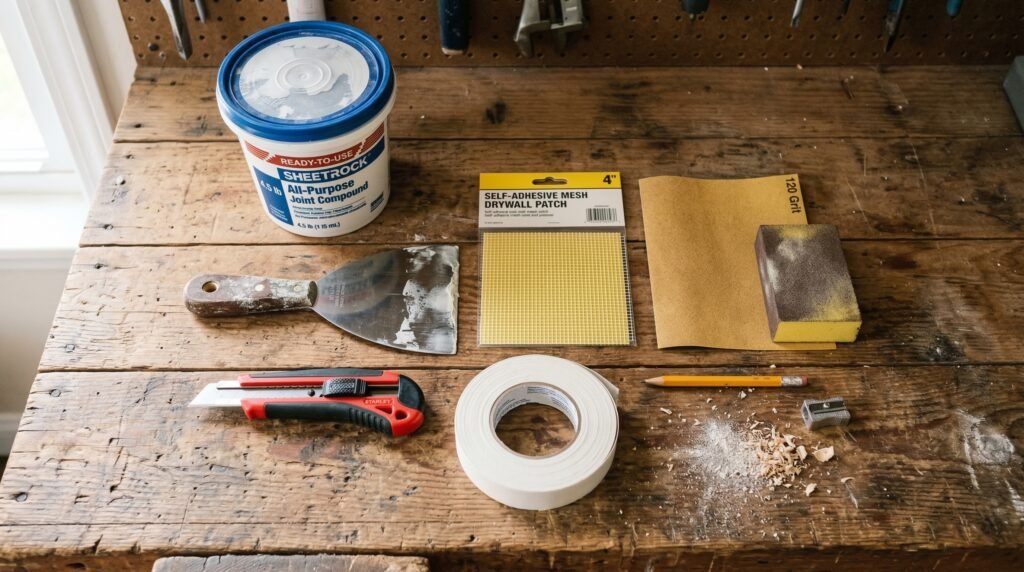
Tools
- Putty knife (3-inch) – for use in applying joint compound in filling small holes
- Drywall knife (6-inch) – for use in filling large holes
- Sanding block or sandpaper (120 grit + 220 grit) – for use in smoothing filled areas
- Utility knife – for use in cutting drywall or mesh patch
- Drywall saw – for use in filling large holes
- Drill or screwdriver – for use in securing the drywall patch
- Paint roller or brush – for use in the painting area
Materials
- Spackling compound – for nail holes and dings. Costs: $4-6 at Home Depot.
- Pre-mixed joint compound (mud) – for everything bigger than a nail hole. Costs: $8-12 for a small tub.
- Self-adhesive mesh patch – for holes 1-6 inches in diameter. Costs: $5-8.
- Drywall patch kit – for medium-sized holes. Costs: $10-15.
- Drywall screws – for backing the wood.
- Wood backing strips – 1×3 or 1×4 wooden strips for the large holes.
- Drywall primer – if you plan on painting. Costs: $8-12.
- Paint matching – if you don’t have leftover paint from when it was new, bring a chip of paint into Home Depot and have it matched.
Pro Tip: The pre-mixed joint compound in a small tub with a purple lid at Home Depot dries faster and is easier to sand than the standard compound. It is almost the Same price.
Step 1. Identify Your Hole Size
The repair method changes completely based on how large the hole is. Measure your hole before buying anything — this is the most important step.
Nail Holes and Small Dings – Under ½ inch
The most common form of repairs. Damage is caused by picture hooks, nail holes, small screw holes, and dings. The easiest form of repairs that can be completed within the shortest time, only 5 minutes are required without the use of any tools except your finger and a putty knife.
- Examples of damage: picture hook holes, small screw holes, dings
- Repair time: 5-10 minutes
- Materials needed: Spackling compound
Small Holes – ½ inch to 3 inches
Damage is caused by a variety of reasons, such as a doorknob hitting the wall, dings and dents, and the removal of a wall anchor. The damage is too large to be repaired using spackling compound; it needs to be backed by a self-adhesive mesh patch.
- Examples of damages: doorknob dents, wall anchor removals, punches
- Repair time: 30-45 minutes + dry time
- Materials needed: Mesh patch and joint compound
Medium Holes – 3 to 6 inches
Mostly caused by accidents like a fist slam, a heavy object punching through, or a doorknob punch-through. A novice can fix this by using proper techniques.
- Examples: Doorknob Punch-Through, Accidental Impact Holes
- Repair Time: 1-2 hours
- Materials Needed: Drywall Patch Kit, Mesh Patch, Joint Compound
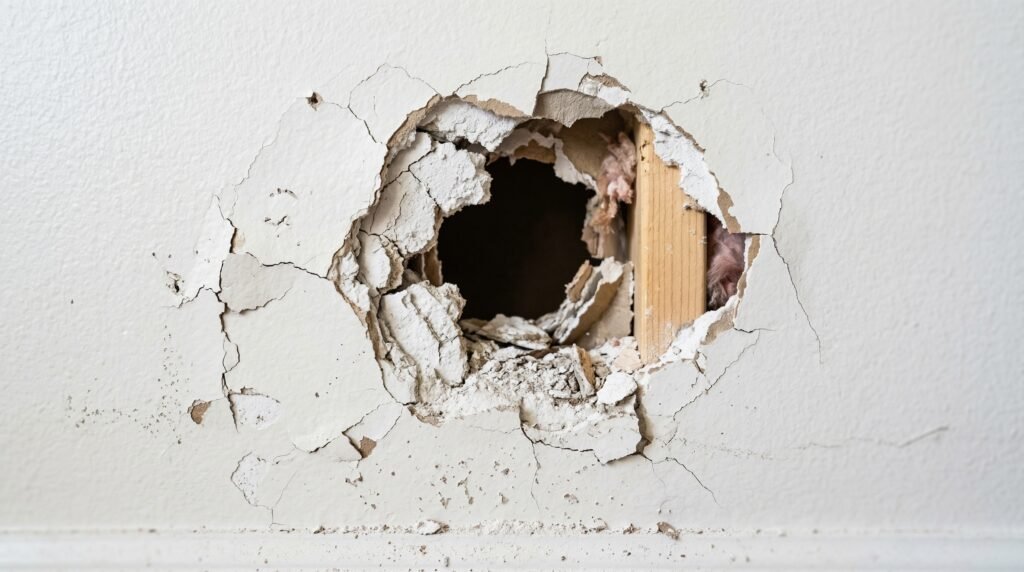
Large Holes – 6 inches and up
These require removing the damaged area of the drywall and replacing it with a new piece of drywall, along with a new backing. These are a bit more complicated, but can still be done by a novice who is patient enough.
- Examples: Renovation Damage, Large Impact Holes, Water Damage
- Repair Time: 2-4 hours
- Materials Needed: New Piece of Drywall, Wood Backing, Joint Compound, Tape
Nail Pops
A nail pop is a bump that occurs on the drywall surface. It is usually round in shape. It occurs when a nail or screw starts to protrude from the drywall. In old houses, it is common for wood to dry up and shrink. Removing a nail pop from drywall is different from repairing a hole since it requires putting the nail back into place.
- Examples: Small round bumps and cracks found on walls and ceilings
- Repair Time: 10-15 minutes
- Materials Needed: Screw, Spackle Compound
Step 2. Prepare the Area
Regardless of the size of the hole, the trick to repairing a disappearance is in the prep work. If done correctly, the repair will disappear. Here’s how to do it the right way:
- Prepare the area: Clear furniture away from the wall and lay an old sheet or drop cloth on the floor. Yes, joint compound dust goes everywhere.
- Clean the wall: Grab a damp cloth and clean the wall in the area of the hole. Make sure the wall is clean of grease and grime. If the wall isn’t clean, the joint compound won’t stick well.
- Clean the drywall edge: Use your fingers or a knife to clean the drywall edge around the hole. Make sure the drywall edge around the hole is solid.
- Check for hidden stuff: Before cutting or drilling near the hole, make sure there are no wires or pipes inside the wall.
Important safety note: Always turn the power off in the room at the breaker box before working on the wall, especially if cutting or drilling. There may be wires inside the wall. A stud finder with AC wiring detection (about $20 at Home Depot) will help you find wires before drilling.
Step 3. Patch the Hole — Instructions by Hole Size
Follow the section that matches your hole size from Step 1.
Fixing Nail Holes and Tiny Dings
This is probably the simplest repair you can do on your own. Get some spackling compound. This is a paste similar to toothpaste. Just take a small amount of this compound and push it into the nail hole with your finger. Use a putty knife to spread out the compound on the surface.
Let this dry completely. This will take at least a couple of hours or overnight. The compound will probably shrink somewhat as it dries. If the nail hole does not disappear after the compound dries, you should apply a second layer. Once everything is dry, you should sand the area with 220-grit sandpaper and then paint.
Pro Tip for Nail Holes: Instead of using a putty knife to spread out the compound on your surface, you should just push the compound into the nail hole with your finger. Use your thumb to wipe away any excess compound.
Fixing Small Holes (½ inch to 3 inches)
You should use a mesh patch with a backing. Just remove the backing and press the mesh over your hole. Press down on every edge so that these edges are flat against your wall.
If any edge is not flat against your wall, you will be able to see your patch. Now you should take your 3-inch knife and apply a small layer of joint compound over your mesh.
Apply a thicker layer over your mesh. This layer should be thicker in the middle and thinner towards the edges. Let this compound dry. Once this compound is dry, you should be able to see that it has changed from purple to white. Sand your compound and then apply a second layer. Once everything is dry again, you should sand your compound again and then paint.
Key Insight for Small Holes: To make your patch invisible, you should apply compound to your surface that extends past your damaged area. Many beginners make the mistake of only putting a small circle of compound over the surface. This compound will be visible. Instead, you should apply compound to your surface that is at least three times larger in diameter than your damaged area.
Repairing Medium Holes (3 to 6 inches)
If you want the easiest way out, you can simply pick up a drywall patch repair kit from the local hardware store. It includes an aluminum plate that you insert through the hole from the opposite side of the drywall. This creates a firm base for the joint compound. Simply follow the manufacturer’s instructions. The steps may slightly vary from product to product.
If you are the DIY kind of person, you can apply the joint compound. To begin with, place a large mesh drywall patch over the damaged area. It should extend at least 2 inches beyond all sides. Next, apply 3 to 4 coats of joint compound over the patch. Allow the compound to dry between coats and sand between coats.
Pro Tip: Do not apply a thick coat of joint compound over a large area. It may crack during the drying process. Instead, apply multiple thin coats. Three coats are better than one.
Fixing Large Holes (6 inches and up)
For large holes, a drywall patch is a necessity. A drywall patch is simply a new piece of drywall cut to fit the hole precisely. First, use a drywall saw and a straightedge to neaten up the ragged edge of the drywall and turn it into a neat rectangle. This neat rectangle will greatly facilitate the patching process.
Next, cut two stiffeners from a 1×3 or a 1×4 piece of lumber, slightly longer in height than the rectangle. These stiffeners will be inserted into the hole and attached to the sides of the drywall. Afterward, cut a drywall patch and screw it in place, matching it precisely to the rectangle. Finally, apply joint compound over the seams and screw heads, and press drywall tape into the compound.
Fixing Nail Pops
In fixing nail pops, the steps to follow include driving two drywall screws about 2 inches above and below the popped nail. This will cause the drywall to be tight against the framing. The nail will then be hammered in so that it is driven in slightly below the surface. What is left is just three little dimples rather than the nail pop. Spackle will be put on the three dimples and will be allowed to dry. Finally, the area will be painted. Without the two drywall screws, the nail pop will probably return.
Step 4. Apply Joint Compound Correctly
The stuff, also called “mud,” is what makes it smooth and nearly invisible. Get it right, and you’ll avoid the ugly, lumpy repair job. Here are the steps, explained in simple language:
- Feather the edges every time. This means applying more mud than the patch and allowing the edges to gradually decrease in thickness, almost disappearing. This is what makes it invisible.
- Apply thin coats. You should be able to see the surface underneath. Thick coats tend to crack.
- Sand between coats. After each coat dries, use 120-grit sandpaper to lightly sand, and then wipe with a damp cloth before applying the next coat.
- Apply at least three coats if the hole is larger than a nail head. This is for a flawless finish.
- Allow it to completely dry. Mud is dry when the area is completely white with no gray spots. Humidity may cause it to take longer.
Pro tip: After sanding, run your flat hand over the area. If it’s bumpy, with ridges showing, it’s not ready for paint. This is the real test.
Step 5. Sand, Prime, and Paint
This is the final step — and the one most beginners rush through. Rushing the finish is why patches remain visible after painting.
Sanding
Get some 120-grit sandpaper and wrap it around a sanding block. We don’t want loose pieces of sandpaper, and a flat surface is a must. Sand the dry compound with a sanding stroke, and then lightly sand it with 220-grit. We want a flawless and smooth surface, and it has to be perfectly even with the rest of the surface. We want it to blend in with the rest of the surface. We run our hands over the surface to check.
Safety Note: Remember, the dust from the drywall is very fine and may irritate your lungs. Make sure you have a respirator on while doing this. Keep the windows and doors open for good ventilation. After sanding, wipe the area with a damp cloth.
Priming
Priming is a must, and it is required. This is because, unlike paint, patching materials do not react in the same way. If you don’t use a primer, a dull area will be visible, and it is called flashing, no matter how smooth the surface is. Apply a coat of drywall primer over the area where you patched, and use a small roller or brush. Allow it to completely dry, and this may take an hour or two.
Painting
When you’re touching up, match the color on either side and repeat that. When you’re painting, move that section of painted surface a little beyond the primed section so that they merge in nicely. You should need two coats over that primed section.
The only way to get an invisible repair is to repaint that whole section of the wall, not just the repair patch. The color can look different from certain angles, and painting that whole section eliminates any possibility of seeing any difference.
Pro tip: Don’t have an exact match in color? Take a paint chip in and get a color match at Home Depot. It’s only going to cost you $5-$8 for a little can that will be enough to touch up that section.
Hole Size Quick Reference Table
| Hole Size | Common Cause | Method | Materials | Repair Time |
|---|---|---|---|---|
| Under ½ inch | Nails, screws, small dings | Spackling compound | Spackling + sandpaper | 5–10 mins |
| ½ inch – 3 inch | Doorknobs, wall anchors | Mesh patch + compound | Mesh patch + joint compound | 45 mins + dry |
| 3 – 6 inch | Impact, punch-through | Patch kit or mesh | Drywall kit + compound | 1–2 hrs + dry |
| 6 inch + | Large impact, renovation | Cut & replace section | New drywall + backing wood | 2–4 hrs + dry |
| Nail Pop | Nail pushing through | Re-screw + spackle | Screws + spackling | 10–15 mins |
Common Mistakes Beginners Make
Skipping the Primer
This is the primary cause of a patch that sticks out after you’ve finished painting. Even on a perfectly smooth surface, joint compound will take up paint differently from the rest of the surface. The principle is simple: prime first. No exceptions. That small eight-dollar can of primer may save you from repainting the whole wall someday.
Slapping On One Thick Coat
You may be tempted to tell yourself to just slap on one thick coat and be done with it. Don’t. Thick coats tend to crack as they dry because they tend to shrink. Before you know it, you’ll wake up to a wall with a whole network of cracks emanating from your patch. Do it in thin coats, at least three coats.
Skipping the Feathered Edges
Painting over a solid disk of compound over your hole is sure to show through your paint as a bump. Instead, paint over a much larger disk—three times or more the diameter of your hole—and feather out the edges to zero. That’s how you make your patch disappear.
Paint the joint compound only after it’s fully dry
The paint will crack if you apply it while the joint compound is damp. Ensure that it is purely white, with no grey areas. It might take longer if it is damp outside. Consider diverting a fan towards the wall if you are in a hurry.
Don’t use the wrong sandpaper grit
Using 220 grit on a new coat of paint only scratches the surface, and that is too fine. It is advisable to use 120 grit first, and then 220. It will save you hours if you get it right instead of wasting time on the wrong grit.
When to Stop and Call a Professional
Patching drywall is generally considered a task that’s okay for a beginner to perform. However, some red flags indicate it’s better to hire someone more experienced:
- If the hole is bigger than 12 inches, the drywall itself might be compromised. A professional should check the drywall before any repair work begins.
- If you find any mold inside the wall cavity and the wall is opened, it’s better to hire someone who’s more experienced. Black or green mold indicates that the drywall has moisture issues that need to be addressed before any repair work begins.
- If the drywall is already damp or soft to the touch, it means that there’s already water damage somewhere. Repairing the drywall will be for naught because it will be compromised within weeks.
- If any wires are running through the drywall that’s been damaged, it’s better to hire someone who’s more experienced.
- The same rules apply if the drywall is on the ceiling. However, it’s more physically demanding and more dangerous to perform the repair on the ceiling. If the drywall on the ceiling is severely damaged, it’s better to pay someone to repair it.
Safety note: When cutting into walls, if you see black or green mold, don’t seal it up. Mold inside walls can indicate moisture or plumbing problems. Sealing up mold without solving the underlying problem can only lead to more problems.
Final Thoughts
The truth is, drywall patching is not as scary as it sounds. Why don’t you give it a shot? Fix the hole, let it dry overnight, sand it, and paint it until it’s as good as new. It’s all about having the right attitude and approach.
The steps are quite simple, really: measure the damage, clean the area, select the right method, apply joint compound in a thin coat, and so on. And that’s it.
The first time, it might take you a couple of hours. The second, it might take you half that. And by the third, it’s just another trick up your sleeve.

Raza is the founder of DIYbeginners. At 24, he built this site to help complete beginners tackle home improvement without expensive professionals or confusing guides. He writes about building, repairing, and buying the right tools — always from a beginner’s perspective, always without jargon. Any Questions? Contact!