
Creating your own DIY living room table can be one of the best weekend project ideas, resulting in an eye-pleasing piece of furniture without incurring a significant expense. Off-the-shelf tables are sold for hundreds to thousands of dollars, so with proper planning and materials, your DIY living room table project can be completed in just two days of work. This tutorial will lead you through all of the tasks of making up an impressive decoration in your living area and keeping to the budget of under $100. Feel free to use this home guide on DIY living room tables to recreate a top-notch design or design it according to your preference.
Why Choose a DIY Coffee Table Over Store-Bought Options
A homemade coffee table makes an excellent piece of furniture to anchor any room, and it also comes with its share of benefits as compared to ready-made tables. The best one has to be that it saves you money, which is true; you can rebuild a table to sell at a price of $2,600 with under 100 in material costs. It is also really difficult to use a ready-made coffee table to shape it to fit your home decor exactly, unlike when it is made by you.
Besides the budgetary gains of making your table, it affords you with invaluable learning opportunities. You would have muscle memory in woodworking skills to be applied to other wooden projects you wish to work on, be able to use tools with confidence, and feel a sense of accomplishment knowing you have made something yourself. The best thing about a DIY coffee table is that it is cheap and unique; no one can easily find another one just like yours in their house.
Further, by having full authority over the quality of materials and construction techniques, you are in full control of the quality. The particle board or other inferior materials of the furniture you buy at the store are exchanged with the powerful solid wood construction of your wooden table that can last many decades.
Popular DIY Living Room Table Ideas for Every Style
These DIY table in living room ideas will inspire you for your next weekend project, and guide you in selecting the right table design for the living room. The strongest choice is that of the designer-inspired coffee table, which mimics the high-priced coffee store pieces. This design is characterized by curved legs and a modern kind of transitional design, which goes well in modern homes.
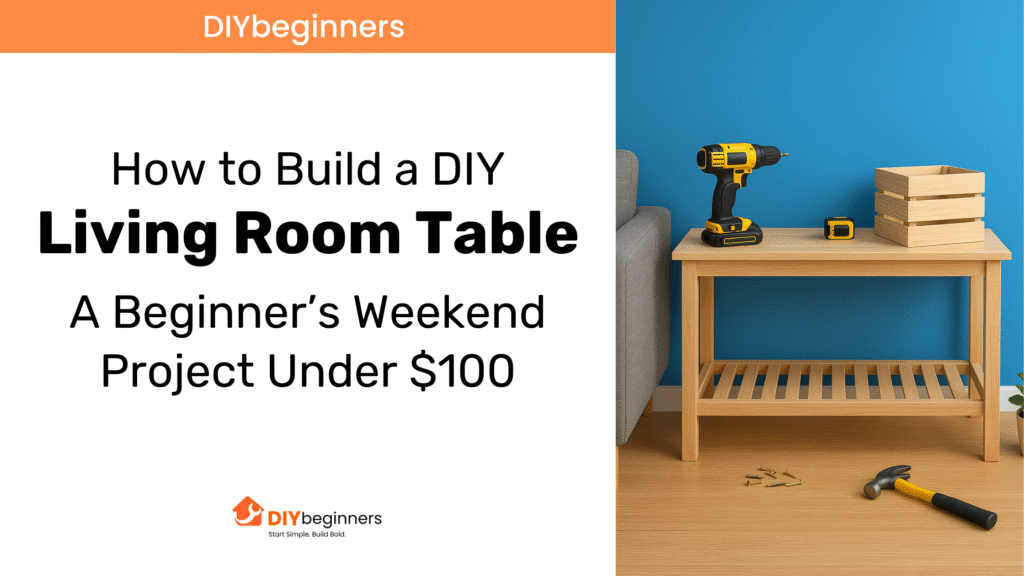
Versatile wood coffee table designs are convenient for individuals with low-key tastes; the modern wood coffee table style is sleek and simple with basic, framing lumber. The design is made with 2 x 6 and 2 x 4 lumber in order to make a refined but not ostentatious piece of furniture that fits any decor.
The most novice option, the quick-build coffee table, is made out of extremely easy 2″x4″ construction that will take around three hours to complete. The style is more oriented towards functionality and speed, so it is just the right design for first-time builders or people who have quite little spare time.
Researching various DIY living room table projects allows you to get the best idea to suit your way of doing it, as well as your taste. Easy DIY living room table ideas can reinvent your room without exceeding the budget and giving the satisfaction of hand-created furniture.
Essential Materials for Your DIY Wood Living Room Table
Thorough planning of the materials list helps your DIY wood living room table project to be within your budget, and at the same time, you can believe the quality you are getting. Extensions to the exact materials that will be required depend on your particular design, but most will need similar basic supplies.
1. Lumber Requirements:
To make the designer-style table, you will use 2×9″ pieces of wood to make the tabletop and to serve as the curved legs in this table. The contemporary version makes use of 2×6 planks to make the top and 2×4 timber on the bottom arrangement. The fast build option only uses 2×4 and 4×4 lumber, thus making it most cost-efficient.
2. Hardware and Fasteners:
Quality wood glue glues the foundation of strong joints and costs about 5-8. Spacer screws or 1″ will be needed to hang hardware, and structural connections will require 2 1/2″ screws. Braces improve stability and prevent wiggling oneself up and down on the barbed wire fence – measure up to 10-15 dollars for metal braces.
3. Finishing Supplies:
Grit sandpaper in varying degrees of coarseness (120, 150, and 220) will prepare smooth surfaces to be finished. It will cost you 15-20 dollars on sandpaper, wood st or paint and a layer of protective cover. Pre-stain wood conditioner is used to provide even color absorbency, particularly with pine lumber.
4. Total Material Cost Breakdown Technically
- Technically: hardware, screws: 15$20
- Finishes: painting: supplies: $20-25
- The Total cost of the Project will be 80-100
- Total Cost of the Development: 80-100
Step-by-Step Construction Process
1. Phase 1: Preparation and Cutting
To start off, make your working space in a well-ventilated place with sufficient illumination. Place all materials and tools together and make sure all are highly accessible. Measure lumber carefully, and record cut lines on lumber with a pencil and a square.
In making cuts to lumber, don’t forget to factor in the saw blade kerf. This minor detail can eliminate the shortness of pieces, which may cause problems in assembly in the future. Cut steadily and with controlled movements, and wear appropriate safety equipment.
The cut parts can be combined without anything on them (no glue or screws). The process of dry-fitting will make the measurement mistakes known before they become difficult to fix. Make any minor adjustments necessary and mark the parts so that any future adjustments can be made.
2. Phase 2: Surface Preparation
And all sand thoroughly, first with a rough paper (120-grit) to remove marks, and some saw sanding, and then with a medium to rough paper (150-grit) to smooth. Sand to 150-grit and finish smooth with 220-grit before finishing. Note that you should pay special attention to end grainwhichh is different than face grain, in absorbing the stain.
Sawdust removed from theommf surfaces by use of a tack cloth or compressed air. Any dust yet to be removed will give you a shoddy-looking finish; hence, take time to make all surfaces clean.
3. Phase 3: Assembly Process
Assemble the tabletop, using wood glue to adhere pieces to one another and clamping. Check for square with a framing square and re-adjust clamps as necessary so that there is proper square. Wait 30 minutes or longer until the glue joints are dry.
Next, affix the base structure with pou,ches, screws, or the use of traditional construction techniques. The pocket hole system forms powerful, invisible connections that appear professional, yet they are not difficult. Drive screws slowly in order to avoid splitting, particularly at board ends.
4. Phase 4: Final Assembly and Adjustments
Connect the tabletop with the base structure with the help of the figure-eight or pocket screws joined under the table. This way is for the movement of the wood without compromising a firm attachment. Check the stability of the table and adjust as necessary to remove wobbling.
Check all joints to ensure they are tight and add some extra screws. The table itself must be firm and stable, and a gentle pressure on any corner should not make it feel loose.
Conclusion
Constructing your DIY living room table means more than simply making furniture; it can mean being self-sufficient, saving funds, and leaving your imprint on the home. So not only is beautiful furniture not what you might think with the expensive tools and years of practice, but it is also no longer just beautiful, it is now beautiful and functional. Through planning, safety, and patience during the finishing process, you can create a piece that, even when compared to costly model replacements at stores, painstakingly stays well under your 100-dollar budget.
The techniques you acquire in the course of this project will come in handy when you are undertaking a good working project. Future success leads to confidence and increased ability that open new opportunities and choices; to more complicated but satisfying builds. The table that you have made out of, as you said, a few pieces of wood and some simple tools, will remind you every day that you can make any possible thing with simple materials, little items, and the will to learn.