
One of those things that, if you hang around for things to get better, they only get worse is a clogged drain. The water sits there in your sink, draining slowly or not draining at all. And then it just sits there, still as a stone, staring at you, and you are staring at it, trying to determine what you are going to do about it. I know. Been there. Done that. More than once.
When you have a clogged drain, the first thing you want to do is grab yourself a bottle of Drano or some other kind of drain cleaner and go to work on that clogged drain of yours. But what I have learned the hard way a time or two is that not only are these kinds of chemicals bad for your pipes and bad for the environment, but they may not even solve the clogged drain problem you are experiencing to begin with.
It just makes it go away for a while until it clogs up again. But the good news is that most household clogged drains can be solved in 15 to 30 minutes without one single drop of any of those chemicals. I have used all these techniques myself, and I shall give you a genuine review of which ones really work and which ones can be skipped.
The article discusses 5 techniques that are really helpful for clearing blocked drains. The techniques range from easy to difficult. The techniques are arranged from easiest to most difficult. You can begin with Technique 1 and move down the list until the water flows freely.
Why Chemical Drain Cleaners Are Worth Avoiding
I’m not saying that chemical cleaners don’t work sometimes. Sometimes they do. But I can give you three solid reasons why you should try physical cleaners first before resorting to a chemical like Drano.
- They damage the pipes eventually — chemical cleaners work by producing heat through a chemical reaction. The heat damages PVC pipes or corrodes metal pipes.
- They are dangerous to use — chemical cleaners are caustic enough to cause chemical burns on your skin or damage your eyes. Every year, people end up seeking medical attention for chemical burns on their skin or their eyes from splashback when pouring chemical cleaners into their drains.
- They don’t always fix the clog — chemical cleaners can dissolve part of a hair or grease clog, but leave the rest of it intact, so you have a slow drain all over again a week or so later.
Key Insight: The American Chemical Society indicates that “the active ingredient in most drain cleaners is sodium hydroxide, also called lye.” This chemical may reach as high as 250 degrees F in the pipes. PVC pipes, which are most commonly found in today’s homes, begin to soften when they reach 140 degrees F.
What You’ll Need
You won’t need all of these for all of the methods. Just get whatever you can, and then follow along with the first method.
- Kettle or Pot – for boiling water method
- Baking Soda – just a normal box of baking soda that you can get in your kitchen cupboard
- White Vinegar – just normal distilled vinegar. Not apple cider vinegar
- Cup Plunger – just a normal red rubber plunger for your sink drain. Not a toilet plunger
- Drain Snake (Hand Auger) – This costs between 15 and 25 dollars at Home Depot
- Bucket and Old Towels – for catching water when you are cleaning your P-trap
- Adjustable Wrench or Channel-Lock Pliers – for removing P-trap connections
- Rubber Gloves – always wear these when working on your drains
Pro Tip: Get yourself a drain snake if you don’t already have one before you need it. The 20 dollar Cobra brand hand snake that you can get at Home Depot has cleared every clog that I have ever given it. It will save you money on calling a plumber the first time you need it.
Method 1: Boiling Water
First, boil water. This is free, only takes 2 minutes to do, and, believe it or not, often works for clogged kitchen sink drains caused by grease or soap scum.
Boiling water is best for: Kitchen sinks with grease or soap scum buildups. Slow-draining sinks, but not totally clogged.
Not best for: Bathroom drains with hair clogging them. Boiling water does not work for hair clogs.
Safety Warning: Never pour boiling water into a porcelain sink or toilet, as the porcelain can crack. Pour slowly down the drain opening, not on top of the sink. Also, do not boil water for pouring into PVC pipes that are already damaged or are over 20 years old.
Pro Tip: Add some dish soap to the clogged drain before pouring the boiling water down the drain. The soap helps dissolve grease clogs and washes them down the drain as the boiling water flushes through.
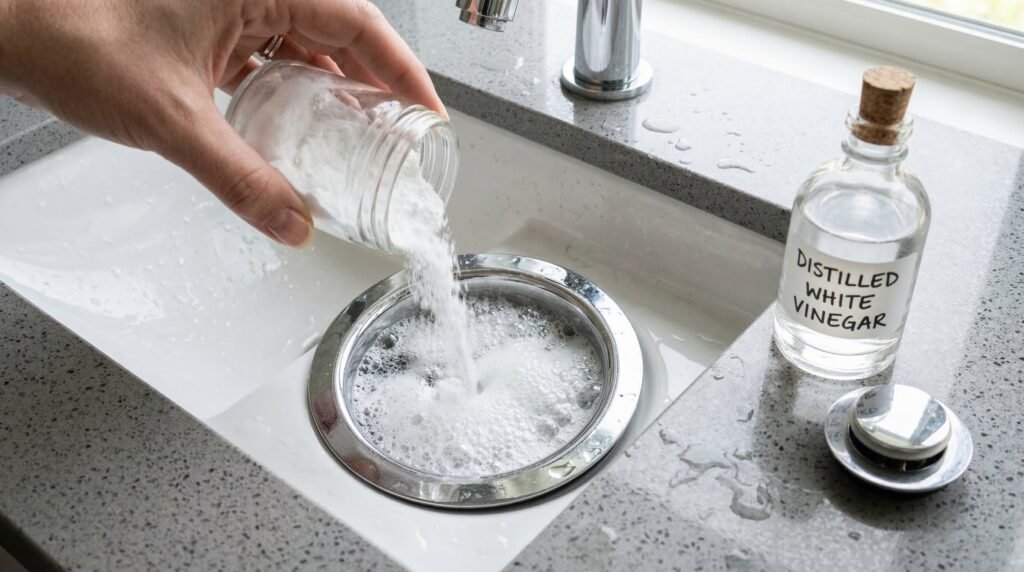
Method 2: Baking Soda and Vinegar
This is what everyone suggests, and it does, in fact, work. It does not, however, work for the reasons that most people expect it to. The fizzing action that occurs between the two, as they mix, does, in fact, help dislodge the blockage. It is, in fact, the hot water that rinses away the blockage.
How to Do It
- First, you will want to get rid of any water that may have collected in the sink.
- Next, you will want to put a cup of baking soda into the drain. You will want to try to get it to go down into the drain, as opposed to just putting it on top.
- Immediately following that, you will want to put a cup of vinegar into the drain.
- Next, you will want to put a plug into the drain hole.
- Next, you will want to wait for 15 to 20 minutes. This is, in fact, the hardest part of the entire procedure.
- It is during this time that the fizzing will begin, and you will start to hear it.
- Flush with the hottest tap water you have for 2-3 minutes. If you can afford it, boiling water is even better.
Best for: partial clogs, slow draining, and overall maintenance. This is good to use on bathroom sinks and shower drains.
Not best for: clogged drains with standing water. This is because the baking soda will not be able to go through the blockage.
Key Insight: Baking soda and vinegar can also be used for your monthly drain maintenance. By pouring this mixture into your drains once a month, you are sure you will not be disturbed by a clog anytime soon. Five minutes of prevention will save you hours of repair.
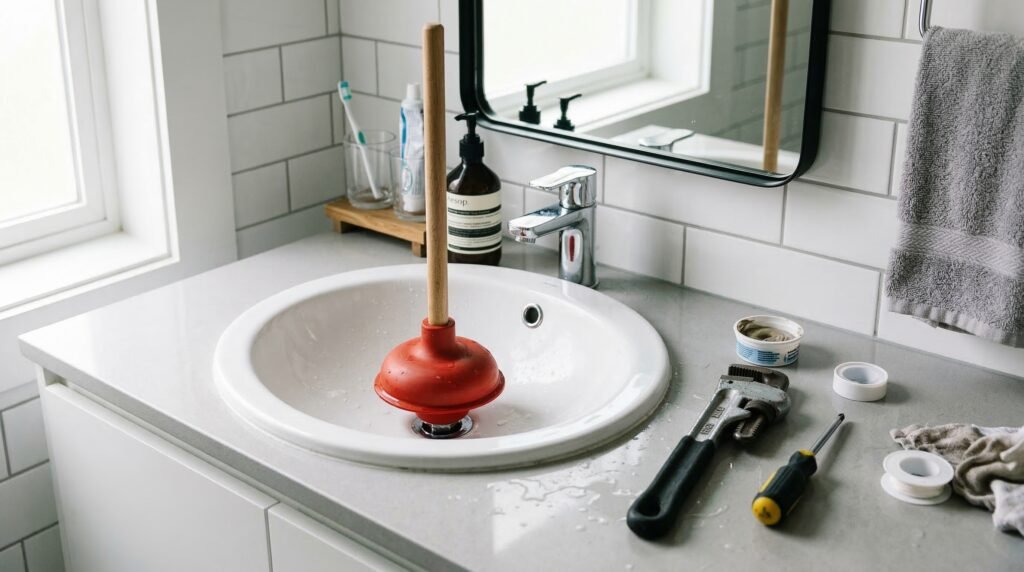
Method 3: The Plunger
The best device for clearing a blocked drain is a plunger. The reason that most people assume that a plunger is not effective is that they are not using it correctly. A plunger is effective for clearing almost any type of clog that has not been caused by a solid object or a major buildup of material inside the pipes.
First of all, be sure that you are using the right type of plunger. The flat-bottom cup type of plunger, the old-fashioned red rubber one, is for sinks and tubs. The flange type of plunger, with the extra lip of rubber, is for toilets. The wrong type of plunger means no suction at all.
How to Use a Plunger Correctly
- Fill the sink with water that will cover the rubber part of the plunger. This will normally be about 2 or 3 inches deep.
- If you have a two-basin sink, clog the second drain by putting a wet cloth into it. This will ensure that the clog does not get help from the second drain.
- Place the rubber part of the plunger into the clogged drain. Press down on the plunger handle in order to ensure a seal is made. No air pockets must be present between the edge of the plunger and the clogged drain.
- Push down on the plunger handle while at the same time pulling it up. This is one plunge, and it is as important to pull up on the plunger as it is to press it down. This action must be repeated 15 or 20 times without taking the plunger out of the clogged drain.
- Once you have made the last plunge, pull the plunger up fast in order to break the seal. If you have succeeded in unclogging the drain, water will come rushing down.
- Subsequently, hot water must be run for 2 or 3 minutes.
Pro Tip: If you are having trouble getting the plunger to create suction, you can apply a thin layer of petroleum jelly (Vaseline) to the edge of the rubber cup. This will give you a better seal on the surface of the clogged drain, and it will make a world of difference in terms of suction power.
Best for: fully blocked kitchen and bathroom sinks, bathtub drains. Most versatile.
Not best for: clogs further down the pipes, as a plunger only works well on clogs near the surface of the drain.
Method 4: The Drain Snake
If the plunger does not work, then the drain snake will. This is the same method that professional plumbers use as their first tool; however, a basic hand snake does the same for $20 instead of $150.
A drain snake is also known as a hand auger. A drain snake is a flexible metal cable that is coiled inside a drum. It is then inserted into the drain, and when it meets the clog, it is turned to break through the clog or grab it and pull it out.
How to Use a Drain Snake
- Put on your rubber gloves. Whatever comes out of the drain is not very pleasant.
- Remove the drain stopper or strainer. This allows you access to the drain opening.
- Push the end of the cable of the snake into the drain opening. Turn the handle of the snake while steadily pushing the cable into the drain.
- When you feel some resistance on the handle of the snake, you have located your clog. Continue turning the handle of the snake. The part of the cable that turns is designed to break up your clog or hook onto it.
- When you feel your cable hook onto your clog, pull back on your cable while continuing to turn your handle. This will pull your clog out of your drain.
- After you have pulled your clog out of your drain, turn your hot water on for 2-3 minutes to flush your drain clean.
- You need to clean your snake cable with hot water and a rag. Dried-out material on your cable is very difficult to clean out.
Pro Tip: In case you are having trouble, instead of pushing it further in, you should turn the handle slowly as you let the tip of the auger do the job for you, to avoid scratching the inside of your drain pipe or even causing your cable to kink, which will not make it as easy for you to pull it back up.
Best for: Hair clogs in your bathroom drains, stuck clogs in your kitchen sink, clog that you were unable to dislodge with your plunger.
Not best for: Any clog that is a result of items that have fallen into your drain, in which case you should remove your P-trap.
Method 5: Remove and Clean the P-Trap
The P-trap is the section in the pipes that is curving and is located at the bottom of your sink. It is the U-bend that can be accessed by pulling out your cabinet. The main job of the P-trap is to hold a certain amount of water that will prevent sewer gases from rising back up your drains. It is also the section in your pipes that is most likely to get clogged if something goes down your drain.
The hardest method to unclog your drains is also the one that will do the job.
How to Remove and Clean the P-Trap
- Place a bucket under the P-trap to catch the water. There is water and debris in the P-trap.
- Two slip joints are holding the P-trap together. One slip joint is where the P-trap connects to the drain pipe coming out of the sink. The other slip joint is where the P-trap connects to the drain pipe going into the wall. Both of them have to be unscrewed. This is accomplished by turning the slip joints counterclockwise. If they are stuck, you can use channel-lock pliers with a rag wrapped around the nut to protect the finish.
- Carefully lower the P-trap into the bucket. There will be a stench. This is normal.
- Look into the P-trap. You almost certainly will see a ball of hair, grease, scum, or maybe a ring or earring.
- Clean the P-trap well. An old bottle brush or a cloth inserted with a screwdriver works best.
- Also, check the drain pipe that goes into the wall. Shine a flashlight into the drain, and inspect for more buildup. If you see more clog matter, use your drain snake to clear the line before putting the P-trap back.
- Put the P-trap back together by tightening the slip joints by hand. Turn the water supply on slowly, and check for leaks at both connections.
Safety Warning: When tightening slip-joint nuts on plastic pipes, never use a wrench – a simple hand tighten is all you need. Excessive tightening will cause plastic pipes to crack, transforming a simple drain cleaning into a costly pipe replacement.
Pro Tip: When you have access to the P-trap, inspect the rubber washers inside each slip-joint nut. If they are cracked, flat, or hardened, replace them, as they are only $2 for a pack at Home Depot. Old washers are one of the most common reasons for a slow leak under a sink.
Best for: When other methods have failed, when you have lost something in the drain, or when you are experiencing clogs in a frequently clogging drain.
| Method | Best For | Time Needed | Cost | Difficulty |
|---|---|---|---|---|
| Boiling Water | Grease and soap buildup | 2–5 mins | $0 | Very Easy |
| Baking Soda + Vinegar | Slow drains, partial clogs | 20–30 mins | $1–2 | Very Easy |
| Plunger | Fully blocked drains | 10–15 mins | $8–15 | Easy |
| Drain Snake | Hair clogs, deep blockages | 15–30 mins | $20–25 | Medium |
| P-Trap Removal | Stubborn or recurring clogs | 30–45 mins | $0 | Medium |
How to Prevent Drain Clogs
The best drain repair is one that you never have to do. The following are the habits that you should cultivate to keep your drains clear all year round:
- Get a Drain Strainer – A $3 mesh strainer over all your shower and sink drains will catch hair and other items before they go down the drain. The single best preventative device you can buy.
- Never pour grease down the drain – Pouring grease down the drain is one of the worst things you can do to your plumbing. The grease will cool and harden in your pipes. Instead, pour it into an empty can and toss it in the trash.
- Run hot water – Running hot water for 30 seconds after each time you use the kitchen sink helps wash grease and soap scum down the drain before it builds up.
- Monthly Drain Cleaning – Once a month, perform Method 2 on all drains in your home. This 5-minute process prevents 90% of the clogs I used to have to fix.
- Weekly Drain Stopper Cleaning – The drain stopper on your bathroom sink is a hair and soap scum catcher. Pull it
Key Insight: Hair is the number one cause of bathroom drain clogs. You can completely solve the most common cause of clogged drains by putting a $3 mesh drain strainer in your shower drain. It is the best $3 you can spend on your house.
Common Mistakes Beginners Make
Skipping to Chemicals Immediately
The first thought when faced with a clogged drain is to put some Drano in the clogged drain and hope that it does its magic. The trouble with this is that if the Drano does not do its job, you are then faced with a clogged drain full of caustic chemicals that you must contend with. You should first try using the boiling water/plunger method.
Using the Wrong Type of Plunger
The flange plunger is a plunger that contains an extra piece of rubber on the bottom of the plunger. This type of plunger is for toilets only. When you are trying to unclog your clogged sink, you cannot get a good seal. You are wondering why this does not work, and no power is generated. This is why most people do not believe that a plunger works.
Not Blocking the Second Drain in a Double Sink
If you are trying to plunge a double kitchen sink and you do not first plug the other drain, all of the effort you are putting into plunging the sink will go up the second drain instead of going down into the clog. Plug it with a wet cloth first, then plunge away.
Forcing the Drain Snake
When you are using a drain snake, if you are a first-timer, when you hit something, you normally would want to force it. However, you may scratch your pipes, kink your cable, or even push your clog further into your pipes instead of pulling it out. When you hit something, slow down and turn your handle to allow your “tip” to work its magic.
Forgetting to Check the P-Trap First for Lost Objects
If you have an object that went down the drain — a ring, an earring, a toy — don’t bother using a plunger or a snake to retrieve it. You’ll only be pushing it further down or losing it for good. Instead, immediately remove the P-trap. In most cases, you’ll find that the object is sitting nicely in the curve of the trap waiting for you.
When to Call a Plumber
These 5 methods will clear the vast majority of clogs in your home drains. There are some instances when it is best to call a professional:
- Multiple drains clogged at the same time — If more than one drain in your home is clogged at the same time, then the clog is in the main sewer line, not in the individual drain. This is a situation that requires a professional.
- Gurgling sounds from other drains when you flush — If a sink is gurgling when you flush the toilet, then it is a sign that there is a problem with the venting or that the clog is in the main sewer line. This is a situation that requires a professional.
- Sewage smell throughout the house — If you notice a sewage smell in your house, then it is a sign that the drain traps are dry or that there is a break in the sewer line.
- The drain clogs again in a week – if the drain is clogging consistently over a period of time, a tree root has likely penetrated the drain pipes, or a part of the drain pipes is damaged. A plumber can check this for you.
- The water is backing up in other fixtures – if the water is rising from the shower drain when you are running the sink, it is a clear indication that the blockage is in the shared drain.
Safety Warning: If you notice a rotten egg smell or a sulfur smell in your house, which is indicative of sewage gas, please open all the windows and leave your house. Sewage gas is a mixture of methane and hydrogen sulfide. Both these gases are toxic and explosive in high concentrations. Please call a plumber from outside.
Final Thoughts
A clogged drain is one of those problems that sounds much worse than it really is. In fact, the overwhelming majority of the time, the cause of the problem is hair, grease, or soap suds that have accumulated in the top five feet of the drain pipe. Any of the five solutions that I am about to list for you will cure the problem without the use of any chemicals or a plumber.
First, there’s the solution of boiling water. Second, there’s the solution of baking soda and vinegar. And third, there’s the solution of the good old plunger. And finally, if all else fails, a $20 drain snake can cure almost any clog. And if all else has failed, the solution of cleaning the P-trap can be accomplished in 30 minutes, leaving you with a better-running drain than you have had in years.
But the best solution of all is prevention. With a $3 drain strainer and a monthly dose of baking soda, you won’t ever have to worry about a serious clog in the first place. That’s 10 minutes of maintenance time, saving you hours of repair time.

Raza is the founder of DIYbeginners. At 24, he built this site to help complete beginners tackle home improvement without expensive professionals or confusing guides. He writes about building, repairing, and buying the right tools — always from a beginner’s perspective, always without jargon. Any Questions? Contact!